Ttalk.info
Ttalk Tech
IMPORTANT MESSAGE FROM DAVE CLARK
After 11 years of
manufacturing and selling Dave Clark axles, I have decided it is
time to retire. I have asked Tom Lange of MGT Repair to take over
my TD and TF axle shaft business, since the axles seem to best fit
with the other excellent products he manufactures and distributes.
Tom is a knowledgeable MG enthusiast, an honest, respected and
reliable gentleman with whom to do business, and I recommend him
without reservation. From now on, Tom will be the sole supplier of
the axles developed by Jerry Austin and later sold by me, and I am
pleased that these excellent axles will continue to be available. I
have transferred my entire stock of axle shafts and related parts to
Tom, and he will shortly be in a position to provide axles to owners
of TD and TF cars, whether equipped with wire or disc wheels.
I will also be concluding my business of installing alternative
gearsets in T-series differentials, once I have completed the last
few differentials for which I have orders. MGA 4.3 and 4.1 ring and
pinions are getting harder to find, and this seems like a good time
to end my work with these modifications. While Tom is not taking
over this portion of the business, he may be in a position to
provide modified differentials in the future, as gearsets are
available.
I am grateful to the many hundreds of customers who have purchased
and installed my axle shafts, and am proud to say that in all the
years since these axles were introduced, there has not been a SINGLE
axle breakage reported to me, even in cars used regularly for
racing. I retire with a great sense of satisfaction and pride.
Henceforth, for all information regarding these Dave Clark/MGT
Repair axles, I ask you to please contact Tom Lange directly at
tlange@acadia.net, and also
see his home-page at mgtrepair.net
Dave Clark
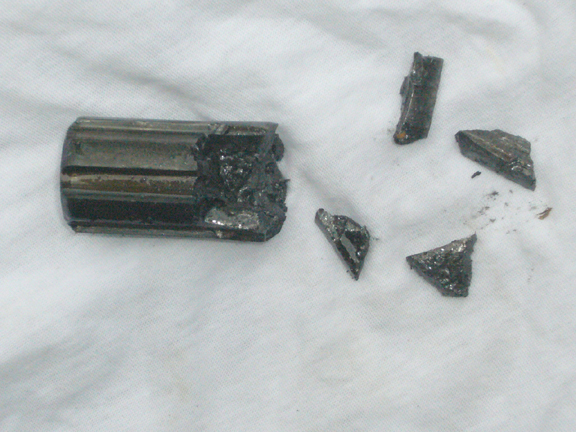
Broken rear axle shaft
Breaking a rear axle on our MG TD has been a steady problem for almost 60 years. If you compare the three shafts shown in the picture you will understand why.
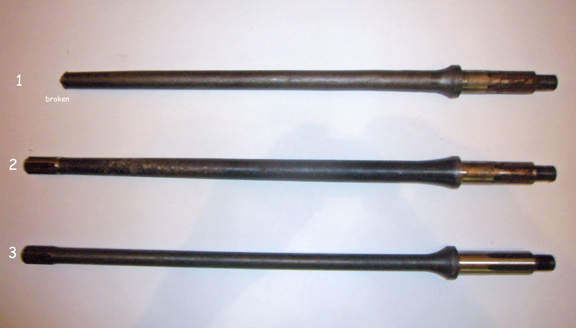
Number 1
(on top of the picture) is the original one, made somewhat in the 50's
and possible delivered with my TD # 29276 in 1953. As you can see
the surface is very poor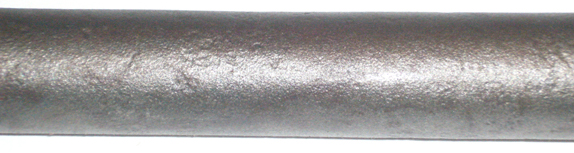
, some porosity are visible because the surface was not machined.
Number 2 in line shows a replacement, which was installed, may be in the 70th, when the car was fully restored. It is a very similar shape, but fully machined.
What you not can see is the material specification. Both of them should be made according Factory specification from AISI 1340 carbon steel and heat treaded to a surface hardening of #50 to #55
Good news now!
The late Jerry Austin decided to assist TD, TF, and YB owners by eliminating that fragile factory axle and provide an extra-duty shaft made by a company that has produced axles for many, many decades.
Unfortunately, Jerry passed away in 2011. Dave Clark stepped in and took over Jerry's operation. Here's Dave's description:
"I think Jerry passed away last July or August. I had an axle customer in October that was looking to buy the half shafts so I gave him Jerry's contact information. It took him a while to get in contact because Dee (Jerry's widow) was not looking at the emails for that address. When he let me know Jerry had passed and gave me her phone number I called Dee to ask her what she was planning to do with the half shaft business. I told her I thought it would be a nice fit with my axle business. She gave me the manufacturer's phone number so I called and worked out the new distributorship. Dee and I then came to an agreement and I drove over to meet her and pick up her remaining 49 half shafts."
As of March 1, 2018, please contact Tom Lange for axle shaft availability. Click here.
Those axle shafts are made from high-duty material with other improvements incorporated. The result is certainly a much more reliable axle than the original one.
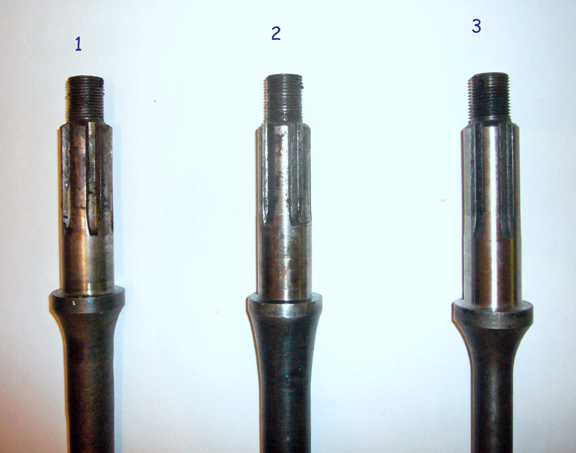
Number 3 shows you how the new one looks like and here are the further details of this upgraded axle:
The material now is AISI 1541, which is a high Manganese Carbon Steel. The heat treating is by high-temperature induction and it is now done to #62 (which penetrates further to about 1/3 of the diameter).
For further Material details see: http://www.efunda.com
The factory shaft was 15/16” in diameter from the splines at the end that fits into the differential and is now reduced to 7/8” the whole length up to where it tapers upward to the axle bearing stop surface. This makes that area a good deal more resistant to failure, as it provides more twisting with the strain of starting out or snapping the clutch. It works in fact as a spring bar. Thus reduce breaking in the typical spot at the end of the splines. (See Gord Clark's text on previous page- Bud)
I did not know all of that when my RH rear axle shaft failed. It was a beautiful day in May the weather was great and I finished the seasonal inspection of my car. I decided for a tour around the block to find out if everything works fin. After a halve mile there was a noise like a "bang" but the vehicle works OK so far. At the next corner the next “bang” and now there was no longer any transmission. The axle shaft was broken.
I call my wife to tow me home. In the meantime it’s starts to rain.
Isn’t it Murphy? In the garage I remove the RH side rear Wheel,
brake drum and bearing housing and get out the broken shaft.
Unfortunately but logically the portion inside the bevel gear is
still in position.
What’s to do? I ask the computer, but more precise the Enthusiasts Experts from BBS and I get a very fast answer and good advises as usual.
Barc Cunningham
provide me the information for a special tool to be use to drive out
the broken piece. I made this special tool from a length of ½” (12
mm) steel rod about 3 feet long, which was drilled at one end and a
3/16” (5mm) drill rod was glued into this hole using epoxy. It
extends about 8” (200mm).
A second tool was a small round magnet attached to another steel rod.
Next step was to
remove LH wheel, brake drum and bearing housing to be able to pull
out the axle shaft. In the darkness of the axle housing there is
nothing really to see. But with a torch and some passion you can
imagine where the way for the special tool should be.
A small modification on the tip was necessary. The tip needs some
special shape. On the grinder it was flattened to get better access
trough the differential gear box. The magnet rod inserted in the
opposite axle housing.
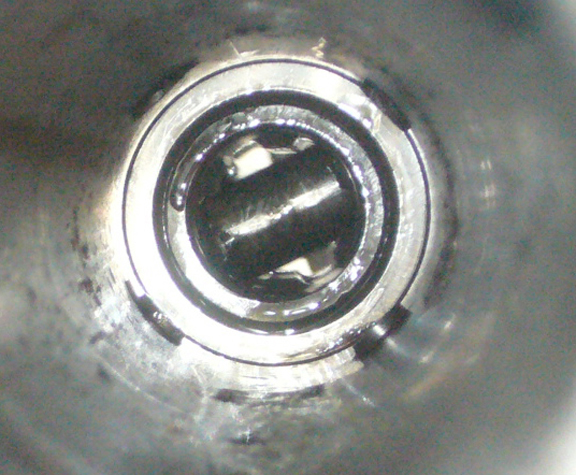
The second attempt was successful. With a light blow with a hammer
the broken piece came out and was already on the magnet. In the
picture you can see the pinion gear pin and the groove in the
serration were the tool must go through. There is not too much
space.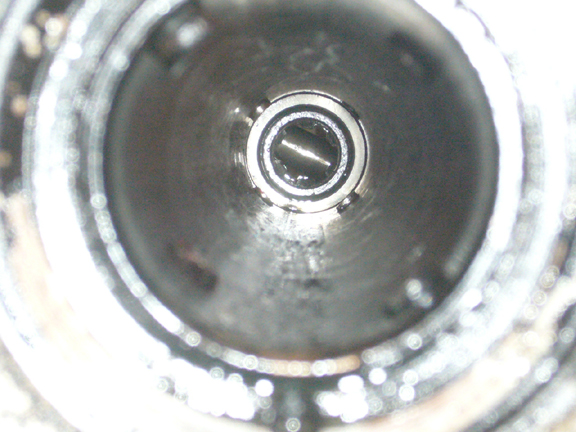
Here is the
other end of the axles, the inner portion.
As you can see from the picture, there was high torsion load to
destroy the shaft. The other shaft looks like new. There is nothing
to see.
I have decided to replace both sides at this time and store the
other as spare. I'll get the reinforced version from Jerry Austin as
described at the beginning. He offered regularly this reinforced
version in Ebay.
With the new reinforced axle shafts I hope never to use the special
tool again. Anyway, it was a nice experience and takes me less than
2 hours to make the tools and get the broken parts out.
I like our TD's they are so simple!
Please contact Tom Lange for information. Click here.
Note: Needless to say that I have nothing to do with Jerry/Dave's axles except to be a satisfied customer*******************
Here's Guenter's image of the broken pieces as he found them
And here is his "Mouse Hole" image of the view into the axle tube:

email to:Bud@Ttalk.info