Ttalk.info
This page has been created for the sole purpose of showing what I've done to my TD to give me some degree of protection from drivers who may have difficulty seeing Lazarus' low tail lights. I have no idea as to the legality of this modification, so I certainly don't suggest that anyone else follow my example.
A few weeks ago I was in some traffic, waiting to make a left turn. The vehicle directly behind me was one of today's behemoth SUVs being driven by a young lady who was engaged in a conversation on her cell phone. Traffic moved slightly. I moved with it, and stopped. The vehicle behind me just barely stopped before hitting me. I immediately realized that the driver couldn't even see my tail lights because of the high expanse of hood in front of her. That was the motivation to do something about it.
As fate would have it, I received an email the next day from a fellow MG'er, Paul Hinchcliffe, telling me about a trailer light setup available at WalMart for about $50. Paul was about to head off in his TC to participate in The British Marque's triathlon and he was going to attach the lights to the outside edges of his fuel tank for safety's sake. Great idea! I'll go and get a set of my own and slap them on. Not quite that simple. There just happens to be a license plate blocking the view of the upper end of the outside of the TD's fuel tank. Here's what I ended up with:
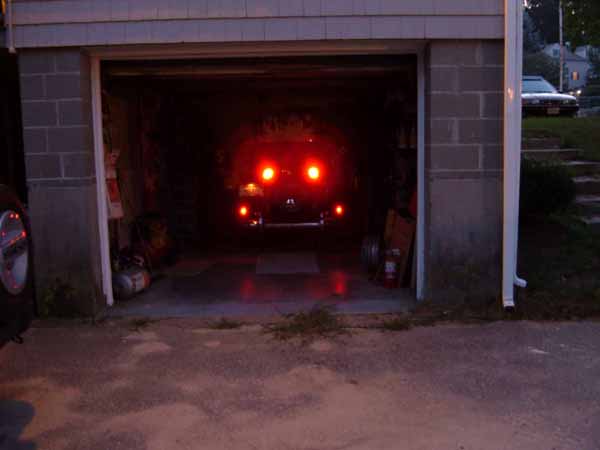
Stop Lights as viewed in garage (not thumbnail).
Okay, how'd I do it?
The lights are a Peterson Safety Towing Light Kit, Model V555, sold at Wal-Mart for $49.95. They have a magnetic base and are intended for use on trailers or other vehicles under tow.


(Images from here down are thumbnails, click to enlarge.)
And, here are their directions:
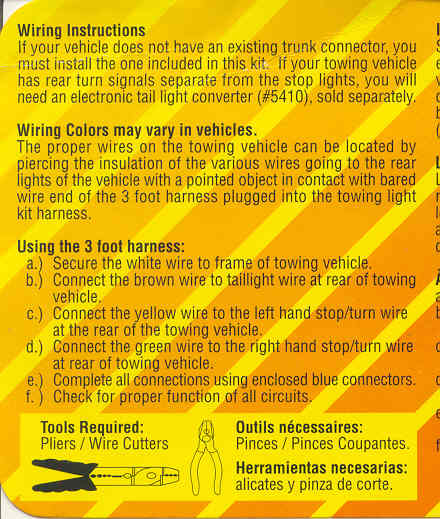
They are wired with the standard trailer flat wire and have molded connectors attached to the cables. They come with a package of those frightful blue guillotine connectors for hooking then up. I probably spent the better part of an hour trying to figure out how I could adapt them to the back of the TD and allow them to be seen. I finally decided that the top of the fuel tank was the only steel surface that could reasonably be used. The installation had be something that was easily removable and would not require physical modifications to the car.
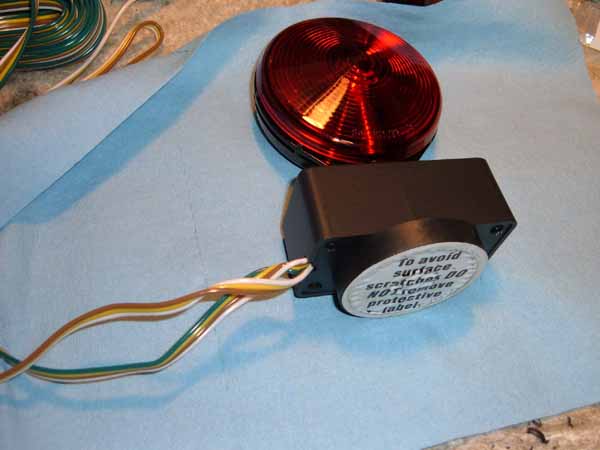
Here's the inside of one of the lights as they're packaged.
 If
you're just using the lights to slap onto a trailer (or lbc) that you're
towing it's not too hard to set it up. The lights, as packaged, are mounted
parallel to the long axis of the wiring box that they are mounted on.
It appeared to me that I could fit the magnetic base onto the top of the
tank if I rotated the lamp 90 degrees on the wiring box. It almost fit
the space between the filler neck and the left member of the spare wheel
carrier.
If
you're just using the lights to slap onto a trailer (or lbc) that you're
towing it's not too hard to set it up. The lights, as packaged, are mounted
parallel to the long axis of the wiring box that they are mounted on.
It appeared to me that I could fit the magnetic base onto the top of the
tank if I rotated the lamp 90 degrees on the wiring box. It almost fit
the space between the filler neck and the left member of the spare wheel
carrier.
The rubber molding protrudes into the space and prohibits the magnet from
fully contacting the top of the tank: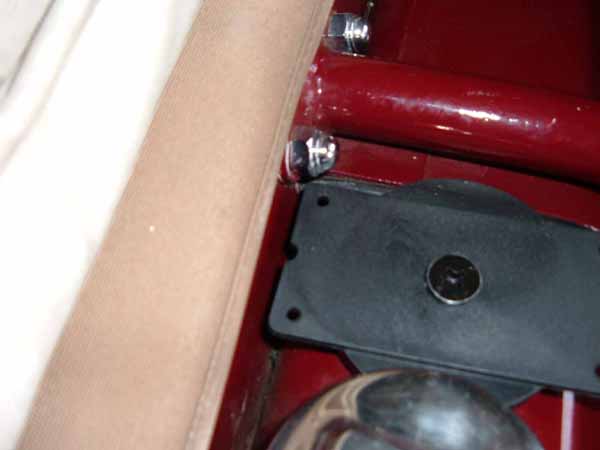
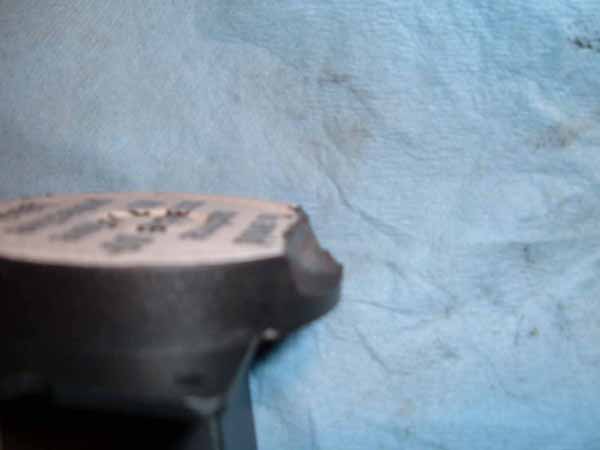
Here's what I ran into. I was determined to do the installation without physical modifications to Lazarus. So, the solution was to modify the magnetic base. It really wasn't that difficult to do, and it had minimal effect upon the magnet's holding properties.
 I tried a few grinding techniques and finally settled upon my trusty Dremel
tool to remove enough of the magnet to just clear the rubber. Here's
the way it ended up fitting.
I tried a few grinding techniques and finally settled upon my trusty Dremel
tool to remove enough of the magnet to just clear the rubber. Here's
the way it ended up fitting.
Here's how the base looked after the
modification: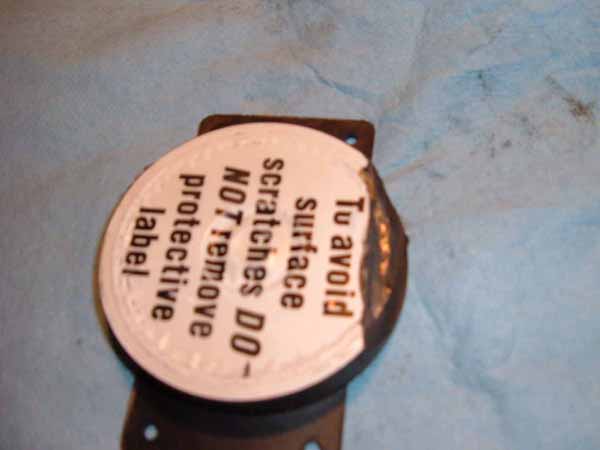
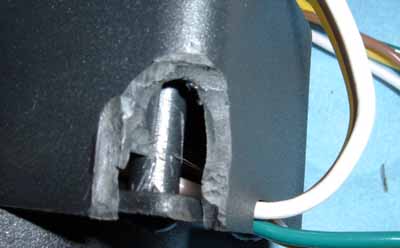 I
found it necessary to cut a notch into the rear corner of the mounting box
in order to clear the chromed nut holding the spare wheel carrier to the
tub. I later filled the notch with RTV in the interest of weather
protection.
I
found it necessary to cut a notch into the rear corner of the mounting box
in order to clear the chromed nut holding the spare wheel carrier to the
tub. I later filled the notch with RTV in the interest of weather
protection.
The only modification required for the lamp on the right hand side was to remove the base of the mounting box, loosen the nut that holds the lamp to the box and rotate the lamp 90 degrees so that the wires exit to the rear.
Wiring:
As you may have surmised earlier, I'm not a fan of using the blue snap-on guillotine connectors for wiring. The lamps, as assembled by the manufacture, are wired with these connectors. I replaced them with crimp-on, insulated spade connectors. In reality, it was not necessary to make any wiring changes. However, I made the connector change for reliability purposes and I made a significant reduction in the lengths of the original cables. As supplied, the lamps have enough wire to reach from the front of a trailer to the rear, looks like about 20' of wire. Also, the cable between the lamps was about 6' long. The lamps, as I'm using them, are spaced just about 2' apart. I left about 3' of cable between the lamps. The main cable feeding the lamps, i.e., the 20 footer, has a molded trailer connector attached to it. I shortened this to about 2'.
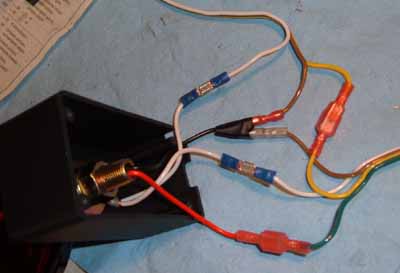
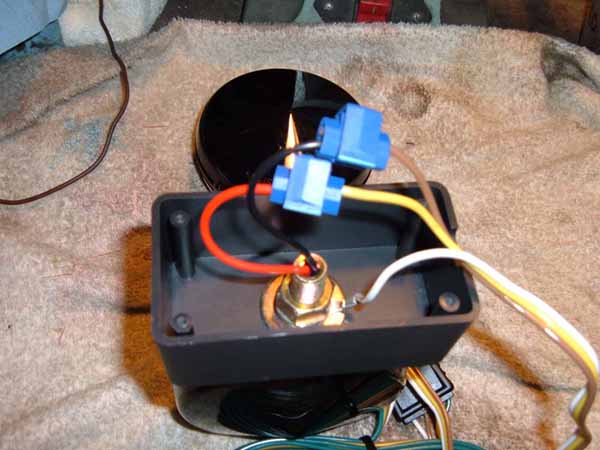
Here's what the wiring looks like at the left lamp. BTW, the uninsulated spade connectors are being used for the ground wires (white).
Here's what the wiring looks like after it's shoved into the connector box, before the cover is attached.
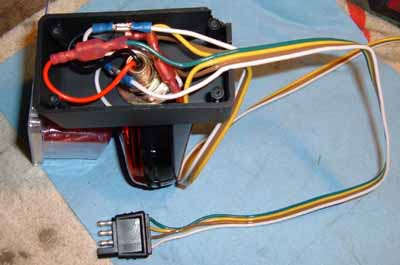
 And
finally, here's what the whole assembly looks like after it's wired up and
ready to be put into place. That is, after a bit more wiring is done
to hook the whole shootin' match up to the car's wiring. Along with the
lamps and their attached wiring, a short section of the same four conductor
ribbon is supplied with the opposite gender connector molded onto it.
This would go onto the tow vehicle. It's about 4' long.
And
finally, here's what the whole assembly looks like after it's wired up and
ready to be put into place. That is, after a bit more wiring is done
to hook the whole shootin' match up to the car's wiring. Along with the
lamps and their attached wiring, a short section of the same four conductor
ribbon is supplied with the opposite gender connector molded onto it.
This would go onto the tow vehicle. It's about 4' long.
Guess what? The short cable is just long enough to reach from the side curtain compartment top to the rear wiring harness along the side of the frame behind the rear axle. In fact, the cable fits very nicely between the left outer edge of the rear floorboard plywood and the inner edge of the covering over the left fender.
 Here's a view showing the cable coming up from the bottom and mating with
the connector attached to the lamps. The rear of my hood (top) is held
in place by snaps, rather than screws. That allows me to feed the
inter-lamp cable into the car. However, it can also be tucked very
nicely under the rear outside flap of the top.
Here's a view showing the cable coming up from the bottom and mating with
the connector attached to the lamps. The rear of my hood (top) is held
in place by snaps, rather than screws. That allows me to feed the
inter-lamp cable into the car. However, it can also be tucked very
nicely under the rear outside flap of the top.
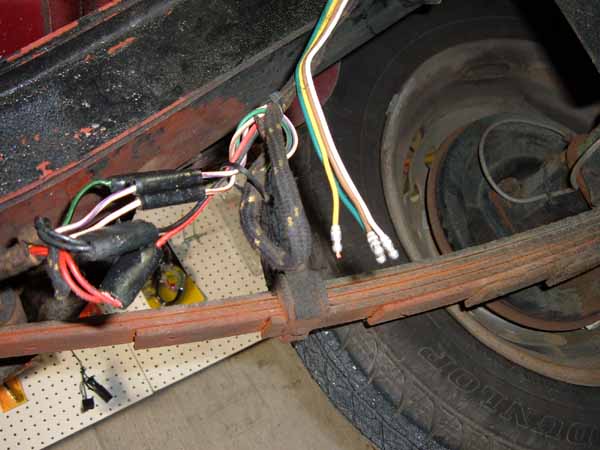 Here's
the other end of the cable where it meets up with the car's wiring. I
have crimped bullet connectors onto the wires. The female connectors
in the harness are already full from the standard wiring, so I had to add
additional sleeves (obtained from British Wiring #C312 double snap
connector) and jumper wires to make the connections. I'll be replacing
these with B/W's #C323 Triple Sleeves shortly.
Here's
the other end of the cable where it meets up with the car's wiring. I
have crimped bullet connectors onto the wires. The female connectors
in the harness are already full from the standard wiring, so I had to add
additional sleeves (obtained from British Wiring #C312 double snap
connector) and jumper wires to make the connections. I'll be replacing
these with B/W's #C323 Triple Sleeves shortly.
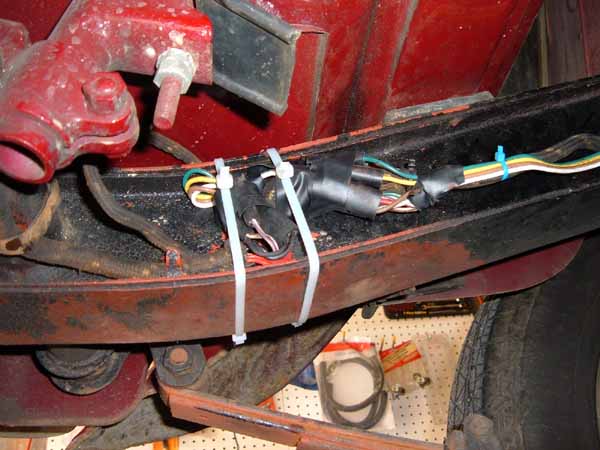 The
finished wiring looks like this.
The
finished wiring looks like this.
![]() One
more comment about the wiring. The standard color code for trailer
wiring uses green for the right turn signal and yellow for the left turn
signal. The lamps, as wired by the manufacturer, have the yellow wire
going to the 'remote' lamp, i.e., the left one. I preferred to keep
the 'input' wire at the left lamp so as to be easy to connect up with the
car's wire using the short cable. However, I didn't want to create a
non-standard configuration. So what I did was to reverse the
connections at the car's wiring harness. I connected the yellow wire
to the TD's right turn signal wire (white/brown) and the green wire to the
TD's left turn signal wire (white/purple).
One
more comment about the wiring. The standard color code for trailer
wiring uses green for the right turn signal and yellow for the left turn
signal. The lamps, as wired by the manufacturer, have the yellow wire
going to the 'remote' lamp, i.e., the left one. I preferred to keep
the 'input' wire at the left lamp so as to be easy to connect up with the
car's wire using the short cable. However, I didn't want to create a
non-standard configuration. So what I did was to reverse the
connections at the car's wiring harness. I connected the yellow wire
to the TD's right turn signal wire (white/brown) and the green wire to the
TD's left turn signal wire (white/purple).
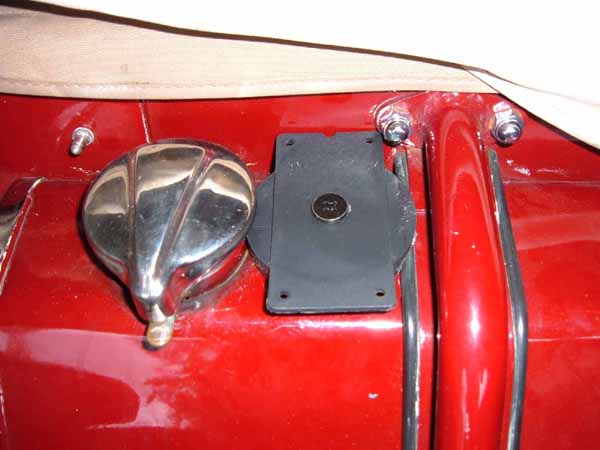
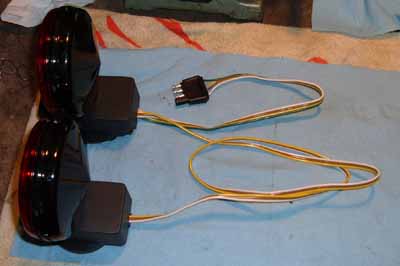
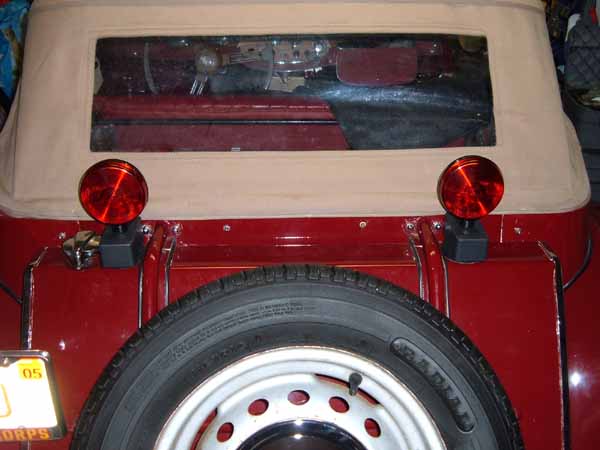 Here's
what the lamps look like from the rear. Before anybody asks --- yes, the
magnetic base is apt to scratch the paint. I'm thinking of looking for
another surface to put between the base and the tank to minimize the
scratching while still holding on. It also looks as if it would be
easy to make a bracket that could be attached to the wiring box and go under
the chrome nuts of the spare wheel holder. They'd be easy to remove.
To test the adherence of the lamps I did about 60 miles at speeds of about
65-70 mph (top down) with the lamps in place. They didn't seem to have
moved at all.
Here's
what the lamps look like from the rear. Before anybody asks --- yes, the
magnetic base is apt to scratch the paint. I'm thinking of looking for
another surface to put between the base and the tank to minimize the
scratching while still holding on. It also looks as if it would be
easy to make a bracket that could be attached to the wiring box and go under
the chrome nuts of the spare wheel holder. They'd be easy to remove.
To test the adherence of the lamps I did about 60 miles at speeds of about
65-70 mph (top down) with the lamps in place. They didn't seem to have
moved at all.
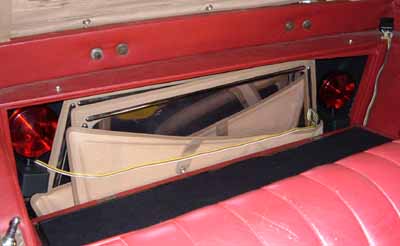
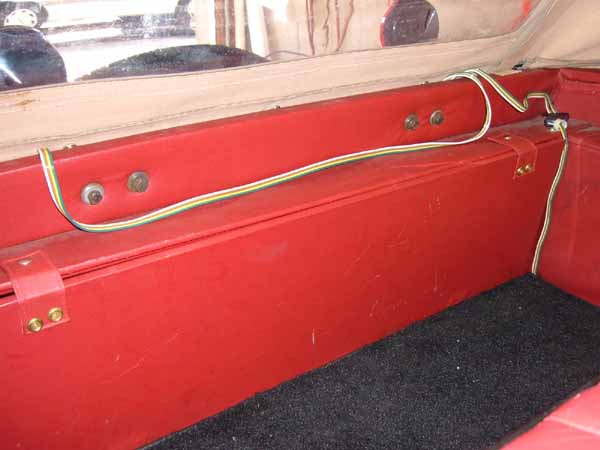
And, if you're not using them, they stow very nicely in the side curtain compartment.
Let me also add that I would not have made this installation without having first installed the brake light relay. These two extra lamps add a current of slightly over 3 amps to the brake light circuit. You might want to take a look at my brake light relay page.
Okay, that's about it for now.

email to:Bud@ttalk.info
created September 16, 2005