Ttalk.info
TD Tub Restoration by Hiram Kelley
Part 1
These pages are text and images provided by Hiram Kelley to show his steps in restoring the tub of his MGTD. A 'prequel' about Hiram's beginning of the project can be seen by clicking on Kelley1.
Click here to get to Part 2
As I go forward with my TD tub restoration
I thought I would post a few pictures of some assembly details I’ve
found important. But first let me say ‘thanks’ to Dave Braun for all
the great pictures on your website and also to Bob McCluskey and his
website for furnishing that critical rear bottom rail and body frame
rail dimension across the back of the tub. Just like most carpentry
projects- find a level line or a square corner- and build outward
from there.
Also, ‘just so’s you know’, I’m using wood from Craig Seabrook, not
because his is any better than others, I just figured since I
started with Craig when I thought I would only need to replace a few
pieces, I should stick with the same supplier. Also I’m assembling
the tub directly on the frame with the fire wall attached to its’
support pillars. I just don’t have room in my little shop for the
frame and the tub together as separate units.
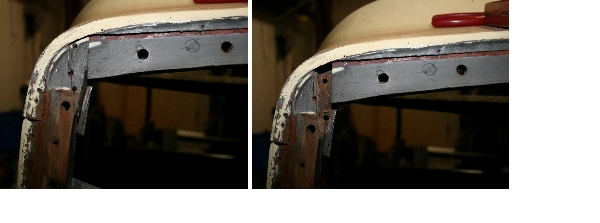
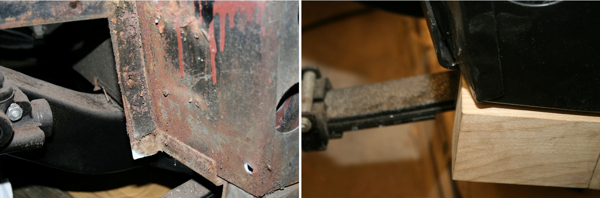
The thing I noticed from a couple of Dave’s restoration pictures was
his problem with the fitment of the front side rail/scuttle side
rail and the dash side support bracket. If you take a look at the
following pictures; the first two are detail shots during
disassembly- notice the dash support bracket just peaking out from
behind the front side rail and even more of the bracket showing when
the broken piece of front side rail fell out.
Now observe the attachment area between the scuttle side rail and front side rail in these next two pictures, after the old wood is reassembled in the original screw holes but without body panels. It looks to me like the scuttle side rail sets somewhat proud of the front side rail thus leaving just enough room for the dash side support to engage the two firewall bolts.
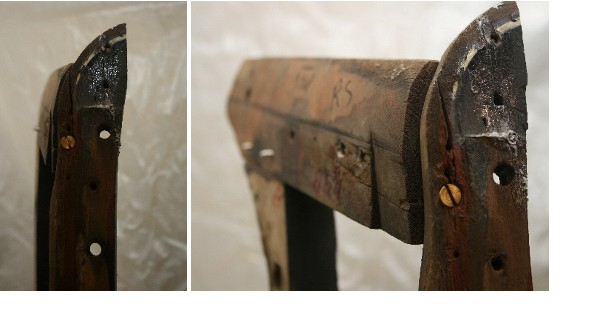
The front side rail is just wide enough as
supplied from Seabrook, you just need to leave enough room by
offsetting the scuttle side rail to the outside, as it was done
originally, and then contour sanding its outer profile for a good
fit under the scuttle panel.
I still have a little more sanding to do on the outer contoured
surface of the side rail to bring the scuttle panel in ‘just a bit
more; but I’m getting there’.
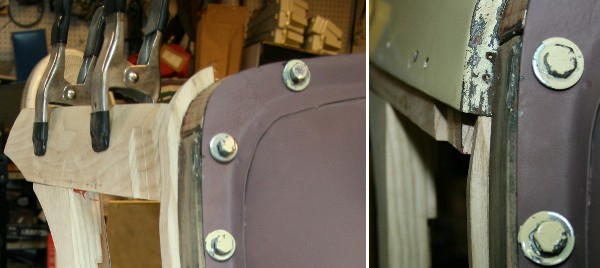
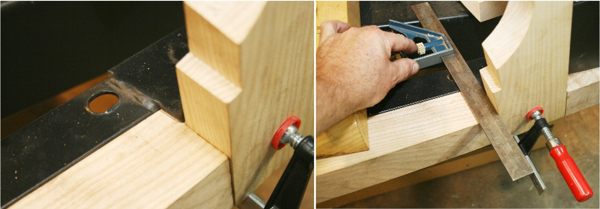
These last two pictures show, from the
inside, the fit of the dash support bracket as it engages the two
firewall bolts extending through the front side and top rails.
Just thought I would post this for any other dang fool who is trying
their hand at a tub rebuild. I can post other fitment info as I go
along if anyone is interested.
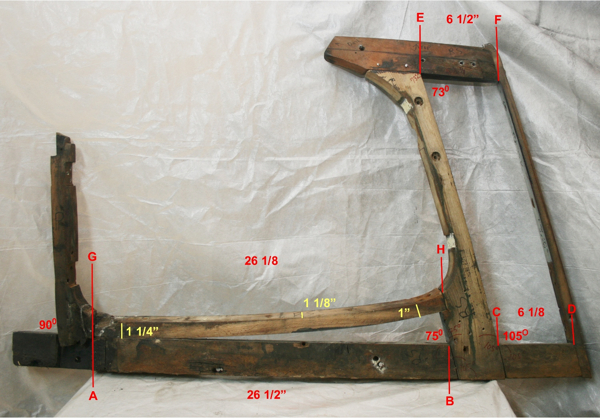
Here’s a picture of the right side tub wood pieces fitted and
screwed back together with some critical widths and angles. Notice
the near perfect parallelogram formed by the latch pillar, the front
side rail, and the main and scuttle side rails. Although it does not
show up well in the photo, the intersection of the main rail and the
front side rail at point ‘D’ is not flush, the main rail is slightly
proud relative to the outside edge of the front side rail. Also, on
my tub, that ‘E to F’ measurement of 6 ½ inches was critical for the
alignment and sheet-metal fit over the scuttle side rail.
Again I’m using wood furnished by Craig
Seabrook.
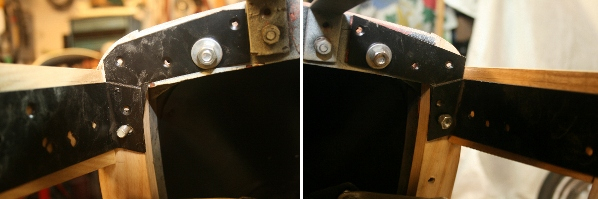
Here’s the alignment of new bottom main rail with the angle-iron
body frame rail. It starts ‘flush to the rear edge of the body frame
rail, as original.
Once this is done and clamped into place notice that the ‘rabbit’ cut in the new wood bottom main rail for the latch pillar lines up perfectly with the back edge of the metal ‘upright’ welded to the angle-iron body frame rail. Seabrook’s piece is spot on and it looks like this should be another good alignment point to check, no matter whose wood you use. When aligned, from back to front, that left only a small amount of wood to remove from the front edge of the main rail to achieve proper alignment with the front face of the metal ‘upright’ portion of the body frame rail and the front side rail (remember that near parallelogram mentioned earlier). I also found it necessary to taper the front face of this main rail as it tapers down to meet the front side rail for proper front sheet-metal fit. Just remember to keep Craig’s original cut angles when shortening any of his pieces.
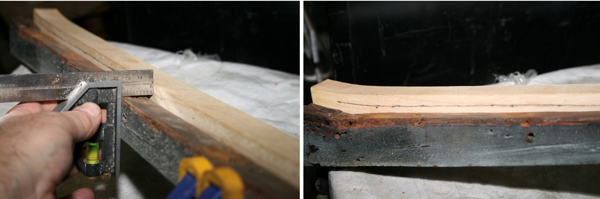
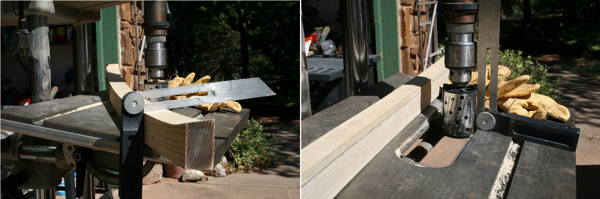
The under door frame rail was a little ‘tall’ as supplied. The curvature was spot on, a perfect match to the original, just a little too long and a shade to tall. What I decided to do to match my original wood profile was to clamp my original rail and replacement rail together, front to back, flush along the bottom, and then take my square to project the top edge of the back of the original rail onto the back edge of the new piece. Now if I keep Seabrook’s door opening angle from front to back I can duplicate my original piece while keeping Seabrook’s top profile. As shown by the pencil line, quite a bit of material needed to be removed to match my original piece. These two under door rails and the two scuttle side rails needed the most work to achieve the proper quarter panel fit.
Here I’m using a sliding ‘T-bevel’ type
square to get the door opening angle to use to set up my table angle
on my old ‘Total Shop’ multi-tool. I am sure the real woodworkers
out there can suggest a better/safer way to get this done but I use
what I have. This old tool’s table, which pivots from front to back
as apposed to most drill presses, which pivot from side to side, and
its big hole in the table and drill-press function were perfect for
re-working the under door rails. Now all I need to do was use a
rotary shaper drill attachment to ‘mill’ along the line I marked on
the backside of the piece and the door opening angle will be
preserved and the front edge of the piece will match the original.
Since this piece has a very pronounced outward curve to it, just
keep the front face of the piece flat on the table as you work the
piece across the shaper. Notice also the heavy leather work gloves
in the picture. That rotary shaper setup I’m using, and the total
lack of any guards or modern safety features, means you better keep
your wits about you. That shaper’s cheese-grater cutting surface
will mill your fingers right down to the bone if you’re not
extremely careful. If you try this method at least wear leather
gloves and please be careful.
Also as mentioned, this under door rail needed a bit of shortening
so I just sanded equal amounts off each end with a disk sander
remembering to preserve Seabrook’s cut angles so as to match his cut
angles in both the hinge and latch pillars.
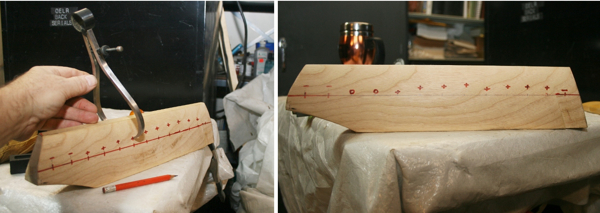
Most of the work on the scuttle side rail
consisted of duplicating the original pieces outer contour on
Seabrook’s for a proper fit underneath the sheet-metal of the
scuttle top. After using a wood rasp, 80 grit sandpaper on a sanding
block, and ‘mark 1’ eyeball to get the profile close I marked an
approximate center line down both original and replacement piece. I
then marked the line off in inches on both pieces at identical
locations along the line. Then using a caliper, to measure relative
thickness between the two pieces I marked the Seabrook piece
accordingly, a plus for too thick- a minus for to thin- and a ‘0’
for good enough. Then it’s just redrawing your lines and marks,
re-marking your progress, and rasp and sand. Then do it all again as
many times as necessary. Notices in the second picture a couple of
the plus marks have now turned to zeros, shows I’m getting closer.
This took a while to get right but was well worth the effort.
I also had to remove a very small amount of material from the lower
front corner of this piece to allow it to set down flat on the top
of the door latch post without its’ pushing the front side rail
forward and slightly out of alignment (remembering again that near
parallelogram mentioned earlier). This was such a small amount that
I’m sure it will vary from tub to tub.
I used this same marking and sanding procedure on most of the pieces
with rounded edges to get a good match to the original woods outer
profile and a good fit under the flange area of all the sheet-metal
quarter panels.
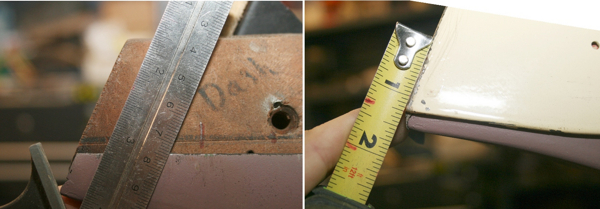
This is an area where the Seabrook supplied scuttle side rail was a bit long when using that 6 ½ inch ‘E to F’ measurement of the parallelogram mentioned earlier as a starting point. Notice how the original lines of the scuttle side rail lines up with the outer edge of the front quarter panel sheet-metal. Until this is made right on the replacement piece the scuttle top sheet-metal will not overlap the front quarter panel properly. Please remember, I’m speaking only as to what I believe to be original wood and panel alignments for this particular tub. I don’t know how these measurements will vary from early to late TD’s or with after-market sheet-metal panels and wood from other sources.
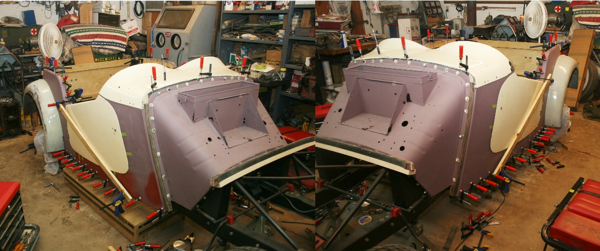
So here is where I am as of today, September 20, checking door to panel fit. Almost ready to treat the wood and start marking and drilling screw holes for final assembly. As you can see-one can’t have too many clamps (lol), I think I’m using near 50 at this stage.

email to:Bud@Ttalk.info
Created 9/21/2010
Edited 7/28/2014