Here are a few more observations along with
the last pictures of the tub wood prior to final fitting and
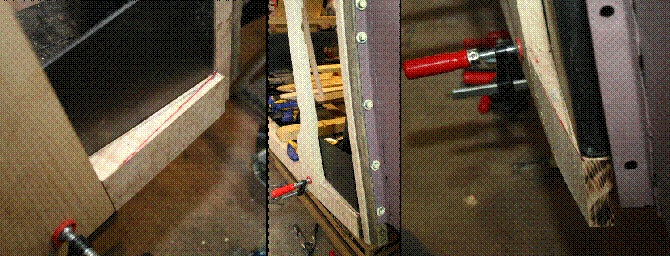
assembly. Here, inside the red circles, are oak shims
(any hardwood would do) glued inside the scuttle rail to latch
pillar joint to fill and tighten up the joint. Note; best fit to
sheet-metal front quarter panels on this tub with Seabrook’s wood
was a scuttle rail tight against the front surface of the latch
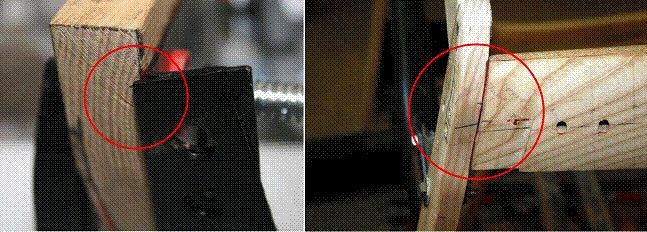
pillar inside the joint. Here’s a shot of the front surface of the
dash side bracket on the drivers side and the misalignment problem
that had to be fixed to achieve the nice tight joint at right. It
seems the two parts of the bracket were welded together out of
alignment. When the bracket is tight against the inside face of the
scuttle side rail a piece of the bracket protrudes into the joint
area. I know it will all be hidden by the sheet-metal, and it
doesn’t seem like such a big deal; but it will prevent the inner
side rail and scuttle side from forming a strong, smooth, flush
fitting joint. There is an easy fix, either grind off the offending
piece of bracket metal for a flush fit, or relieve a small portion
of the front face of the scuttle side rail. I decided to leave the
original bracket, along with this misalignment, intact and make my
repair to the replacement wood. Ah yes, just one more thing that
needs checking as assembly progresses. Both inner front side rails needed a bit of
shortening for a flush fit with the base of the bottom main rail.
Here I’ve marked the line for the final fitting of the bottom of the
driver’s side inner front side rail. There’s that 105 / 75 degree
angle set again. Now when it comes time to fold over the front
quarter panel’s lower nailing flange it will lie nice and flat
across this joint. Here’s the top inner front top rails, both
old and new, clamped back to front, for marking bolt and screw hole
positions. Center both rails on center of cross-piece slot and along
the top upper edge of both rails. While Seabrook’s top rail is a
spot-on match to the original along its top edge I needed to trace
along bottom of old rail onto new rail and remove any excess wood
along this lower surface to duplicate curvature along the bottom of
my original piece. The cross-piece slot on Seabrook’s piece will
also need a bit of widening for proper fit with cross-piece. Outer top edge of inner top rail will need to
be ‘radiused’ slightly to match the original. Notice how original
top rail is slightly shorter than Seabrook’s piece when centered on
the crosspiece slot. This longer length (about 1/8 inch on each end)
actually fits my tub better than the original. So don’t cut this to
length to match the original as that may leave it a little to short
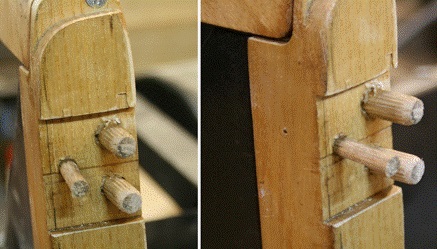
for a tight fit. Test fit first to ascertain proper length, My door wood was OK for now, the only
problems was one of the original door latch mounting plate machine
screws had become inseparable from it’s capture nut and broke off
when I attempted to remove it. Also the sheet-metal door skin had
begun to pucker underneath the escutcheon screws that hold the door
handle to the front of the door. Both screws had begun to pull away
from the wood door latch pillar. The door-skin sheet-metal was all
that was holding the screws in place as the wood surrounding them
had rotted away.
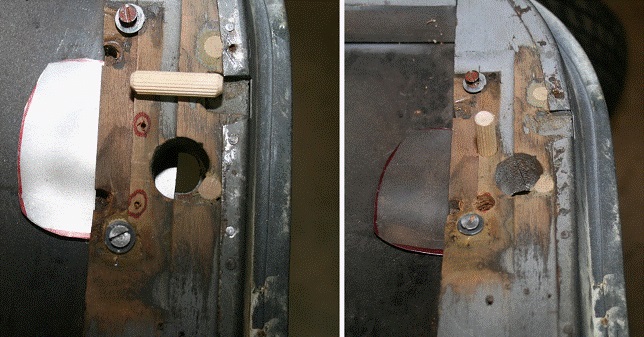
This is a fairly easy fix if the door wood is still solid and
just the screw holes are rotted out and no longer to size. Use a
small diameter drill bit and drill pilot holes through the original
screw holes from the handle side of the door. Next take an
appropriately sized drill bit and from the latch side of the door
use the pilot holes to drill holes for 3/8 inch fluted hardwood
dowels (available from hardware stores and home centers). I slipped
a thin piece of scrap sheet-metal between the door latch pillar and
door skin to prevent the 3/8 drill bit from engaging the screw holes
in the door skin and inadvertently enlarging them. Once holes are of
proper size use a good quality water proof wood glue to coat the
dowels and lightly After the glue has dried, cut off the excess
dowel, sand smooth, and re-drill pilot holes for the door handle
escutcheon screws and mount the door handle. Also visible is an
earlier dowel repair for fitting new door lock screws. This way it’s
not necessary to go to a bigger screw size, which may not look or
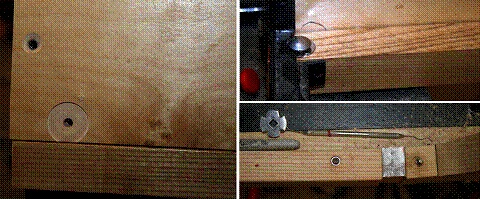
fit as well as the original. As for the door latch mounting plate machine
screw problem just drill out the original hole for either a #8 or
#10 stainless steel threaded insert and problem solved.
I also used these stainless
steel threaded inserts to attach the door striker mounting plates on
the new tub latch pillars as opposed to capture nuts as used
originally. I kind of like keeping the hardware on the side of the
piece not covered up by sheet-metal. And besides it won’t be
noticeable once the latch and interior door panels are in place. Hopefully this won’t happen to you but; if,
when test fitting your doors and drilling
holes in the hinge pillars for the screws- things go terribly
wrong- as they did for me and the upper passenger side hinge(the
back of the door set proud of the rear quarter panel) when I got
everything all tightened down. Drill out the holes for appropriately
sized fluted hardwood dowels. Then after the glue has dried just cut
off the excess dowel, sand smooth, and re-drill. Note to myself;
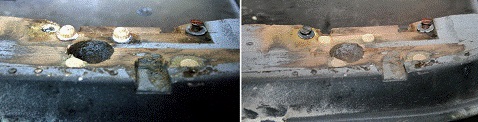
next time measure and mark hinge a little better! Here are some miscellaneous shots of; on the
left, the inletting necessary to use stainless steel torque washers
and carriage bolts on the lower rear corners of the tank panel so as
to not leave the bolt head ‘too proud’ and distort the lower corner
of the quarter panel as it overlays the bolt head. On the upper right is the carriage bolt with
inletted torque washer at the lower inside rear corner of the tub.
These torque washers are 1 1/16” diameter so inletting was done on a
drill press with a 1 1/8” forstner type wood bit. (There is a top
view of one of the torque washers in the shot at lower right.) On the lower right is a picture from above of
the top of the driver’s side under door rail attached to main sill
rail with stainless steel pocket screws. Pocket screws have an
integral washer below the head so as to have a flat bottom with a
larger surface area in contact with the wood. This gives a much
better clamping action when tightened and does not tend to split the
wood over time as a normal flat faced tapered head wood screw may.
Unfortunately these pocket screws have a slightly smaller shaft
diameter so if I was not gluing these joints together I would opt
for a standard wood screw but perhaps replace the original flat
tapered head style with a round head (maybe with a small washer
underneath the head) and just inlet it a little deeper to clear the
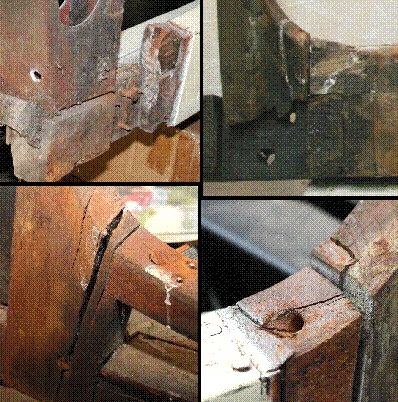
sheet-metal. My original under door rails had both split
at their hinge pillar/under door rail joints. Splits extended from
the two outermost under door rail screws along the grain to the end
of the rail. The passenger side joint pretty much just fell apart
when I removed the sheet-metal quarter panel. The latch pillar/under
door rail joints showed splitting as well only not as severe. It’s
these observations, along with my desire to go vintage racing, which
has prompted me to screw and glue together all the wood to wood
joints on this particular TD tub. I think it better for the whole
tub to react to stress and flex ‘as a unit’ and not just at the
individual joints. I
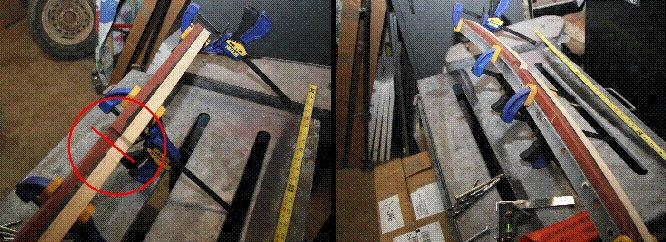
suppose time will tell if that was the right decision. Finally, after I matched up and drilled all
my bolt holes in the two inside front side rails (once again using
the originals as templates) I bolted and clamped everything together
for another trial fitting. I noticed the front tapered portion of
the bottom main rails were sitting slightly proud of the inner side
rails. This would not allow the lower front corner of the front
quarter panel’s nailing flange to properly overlap the front edge of
the inner front side rail. I know, that’s a real mouthful; but I
believe the pictures show what I’m trying to describe. In my case I
just needed to increase the rate of taper to just meet the front
outer edge of the (metal) body frame rail. Now you could just take a clamp and force the
outer end of the bottom main rail inboard and use the inner side
rail attachment point to hold everything in place; but
inward movement here acts to ‘open up’ the latch
pillar/bottom main rail joint. Not a good idea. Especially if glue
is not going to be used, all joints should be as tight as possible
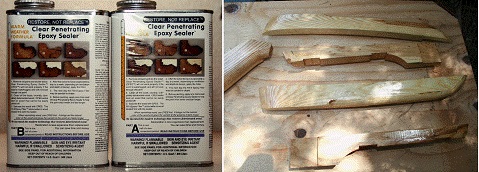
both front to back and side to side. Here’s the stuff I‘ve decided to use on all
the tub wood to help preserve it. It’s from the Rot Doctor (Smith
and Company) specialists in industrial and marine synthetic resins.
They have found a way to save old, dry, rotten, deteriorating wood
and just like the label says it’s a clear penetrating two part epoxy
sealer that does not decrease any of the woods original flexibility.
It’s used a lot on wooden boat restorations and anywhere else wood
needs long term protection from the elements. It’s certainly not
cheep but it does go a long way on new wood.
What the heck, if it works on boats why not an MG.
Finally, with the exception of overlapping
joints which were to be glued, I painted all wood surfaces visible
from inside the tub with a satin black paint to duplicate the
appearance of my tub’s original wood. I used ‘rattle can’
Rustoleum’s satin black; but now that the tub is finished I believe
it’s a little too ‘glossy’ for my taste- probably should have used
another brand. Some tools I’ve found useful. Besides the more familiar screwdrivers,
wrenches and hammers, I thought I would quickly touch on some of the
other types of tools I’ve found the most useful. This is mostly for
the non-woodworkers, folks who are perfectly comfortable with- steel
on steel- type auto body work, but feel a tad lost when it comes to
a ‘T’ series tub wood restoration. Just read a few manuals, take
lots of notes, lots of pictures, and take the time to understand how, maybe
even why, the tub is constructed like it is. After all it’s really
just a big piece of furniture, kinda like a big ol’sheet-metal
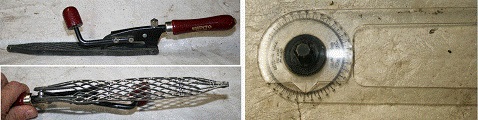
upholstered chair. On the left is a Japanese Special Rasp 10”
long and 1 1/2 “ wide with a course and a fine side, looks kinda
like a bunch of hacksaw blades riveted together; but man does it get
the job done! Works so much better than that old style ‘cheese
grater’ plastic filler file I’ve used for years for rough shaping
wood. A little expensive at $34.80 but man does it make quick work
of shaping wood (garrettwade.com). And it leaves a surface that
finishes off nicely with only a bit of work with 80 grit sandpaper.
On the right, some form of angle finder is also helpful to check
your tub wood’s critical angles before disassembly for later
duplication during reassembly. These are the cutting tools I used the most
often, on the left, an old disc sander with adjustable, tilting
table (rescued from dumpster behind the shop where my son works) and
to the right, a Dremel type rotary tool with a flex shaft
attachment. The disc sander for sanding pieces to length, the Dremel
with flex shaft for grinding the heads of panel nails, as a cut-off
tool in tight places for rusty bolts and machine screws, and for
cutting out small areas of rust perforated sheet-metal for fitting
patch panels. Now this is just a suggestion; but for the
most part I left my table saw alone. With a saw I find it very easy
to remove to much wood. For me it worked much better to just use the
disc sander. And ‘in a pinch’ even the under door rail could have
been re-profiled with that Japanese Rasp, it just would have taken
longer. I’ve found, by marking the piece of wood where it needs to
be for an exact fit and using a disc sander to shorten the wood a
little at a time till it fits, I’m not as likely to cut it too short
the first time and have to use a shim. With the disc sander I can
even set it up to sand compound angles if I need to. I find I have a
greater amount of control, even when I just need to eyeball it for
that last 32nd of an inch needed for a perfect fit. Especially with
Seabrook’s wood. I can sand a little then check for fit, then sand a
little more and check for fit again , all the while –‘sneaking up’
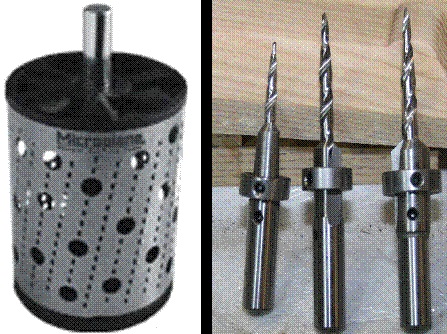
on my pencil or scribe mark. Here’s a close-up of the two inch, Rotary
Shaper drill attachment I spoke of earlier used to shape the under
door rails. (from www.us.microplane.com) and finally on the right a
set of taper point drill bits. These have removable counter
sink/counter bore sleeves and stop collars sized for #6, #8, and #10
wood screws. Use these to drill tapered holes for an exact match to
the screw’s taper. But don’t over-drill the hole or you’ll lose the
benefit of the taper. (from www.rockler.com, and www.garrettwade.com) I also plan on using SAE stainless steel,
slotted head wood screws, machine screws, bolts, and lock-washers
and Loctite where visible, nylocks where not. For an original
appearance all external bolts such as bulkhead, staybars, etc. will
remain whitworth. Inside
the tub the painted over slot headed stainless steel screws will
look original but hopefully have a little more corrosion resistance
than the originals. I’ve found boltdepot.com to have a good
selection with acceptable quality. Also I’m going to try using
stainless steel, four point, square hole, torque washers (from
www.mcfeelys.com) inlet into the wood under all the carriage bolts,
as recommended by Alan Alderwick on page 34 of his book, to prevent
the bolt from both sinking into the wood and spinning when
tightened. This will hopefully allow for some retightening as well.
The 3/8 inch stainless steel carriage bolts had a tendency to gall
when tightened, however I had no galling problems with the smaller
sizes. That being said, I still used just a very small dab of
anti-seize on most of them just in case. So, there you have it. Hopefully these
pictures and insights will be of help as an addendum to the
excellent ‘T’ series restoration manuals mentioned previously. To go to Part 1 click
HERE. For more total assembly information click on
KelleyTubAssembly.doc A Word file)
Ttalk.info
TD Tub Assembly by Hiram Kelley
Part 2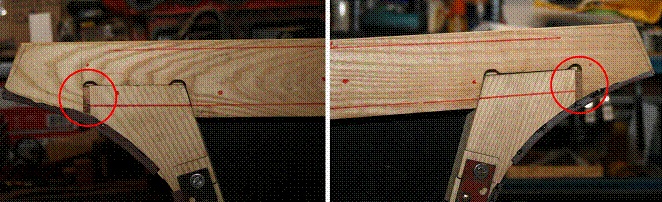


Click Here
for Part 1